Description
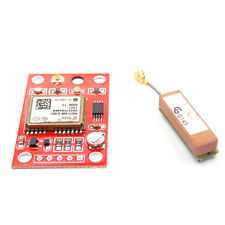
This module is compatible with APM2 and APM2.5, and the EEPROM can store all of your configuration data. Interface: RS232 TTL Power: 3-5v Baud rate Default: 9600bps No battery (this is not safe for airmail) Battery model is MS621FE, requires soldering You can download the test program directly from the ublox website (u-center version 6.31 download (requires Internet connection installation)).
- Module with antenna, mini size with strong signal.
- EEPROM save the configuration parameter data when power down.
With data backup.
With LED signal lights. - Compatible with various flight control modules.
- Power supply: 3V-5V
- Models: GY – GPS6MV2
- The default baud rate: 9600
- Module size: Approx. 25 mm x 35 mm / 0.98″ x 1.37″
How to get started with GY-NEO6MV2 GPS Module
The GY-NEO6MV2 GPS module series is a family of stand-alone GPS receivers featuring the high performance u-blox 6 positioning engine. These flexible and cost effective receivers offer numerous connectivity options in a miniature 16 x 12.2 x 2.4 mm package. Their compact architecture and power and memory options make GY-NEO6MV2 modules ideal for battery operated mobile devices with very strict cost and space constraints.The 50-channel u-blox 6 positioning engine boasts a Time-To-First-Fix (TTFF) of under 1 second. The dedicated acquisition engine, with 2 million correlators, is capable of massive parallel time/frequency space searches,enabling it to find satellites instantly. Innovative design and technology suppresses jamming sources and mitigates multi-path effects, giving GY-NEO6MV2 GPS receivers excellent navigation performance even in the most challenging environments.
Specifications
1.Supply Voltage:2.7 to 3.6V
2.Supply current:67 mA
3.Antenna gain:50 dB
4.Operating temperature:-40 to 85°C
5.Antenna Type:Passive and active antenna
6.Interfaces:UART,USB,SPI.
Pin Description
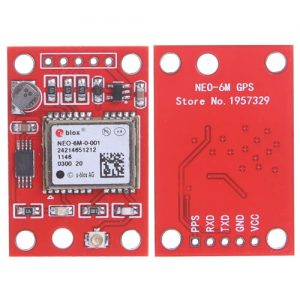
- Vcc-Supply Voltage
- Gnd-Ground pin
- TX and RX-These 2 pins acts as an UART interface for communication.
- PPS (Pulse Per Second) pin is used to time things very accurately.
How to connect NEO6MV2 GPS Module with Arduino UNO?
Hardware and Software Required:
Wiring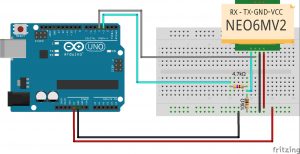
That means, you simple connect the 5V Power/VCC and Ground of your Arduino directly to the receiver. The same goes for the TX (green) wire, which gets conected to digital port 3 of your Arduino. For the RX wire, a small voltage divider is set in place, using a 4.7kOhm (with pink stripe) and a 10kOhm resistor (black/orange stripes). That means for the RX wire, a wire from digital port 4 to the 4.7k resistor, then to the 10k, which is tied to Ground. Where the two resistors are connected, we get the voltage from to the RX port of the GPS module.
Installing a library: TinyGPS
On Arduino, the reference and most advanced GPS lib is Mikal Hart’s TinyGPS. Head over to GitHub and download the latest release first.Download the TinyGPS library here. Once complete, unzip the content into your “libraries” subfolder of your Arduino IDE installation and restart the IDE itself. You should now have a new set of “Examples” under File/Examples/TinyGPS.

